It’s not easy keeping track of all of your health records – let alone keeping track of the rest of the family’s records.
You might currently be keeping track of everything by taking photos in your phone, writing your medications list in your phone notes and tracking measurements like your blood pressure or glucose levels on an Excel spreadsheet.
If you’ve ever downloaded and registered for the Lifecard app, you will know that the single app can replace a multitude of other apps, notes and documents. There are so many features within the app, that it might seem overwhelming at first. Lifecard Personal Health Record is packed with fantastic features to help you track your health and keep everything in one, easy to access app.
Read our top tips below to ensure you are getting the most out of the Lifecard Health Record app.
Tip 1 – Enter your known details
To make sure you are using the app to its full potential, please enter all of your known information. This means entering any allergies you may have, what medications to regularly (or sometimes) take, any medical conditions you have or any immunisations you have received. That way, your medical record will be as complete as it can be.
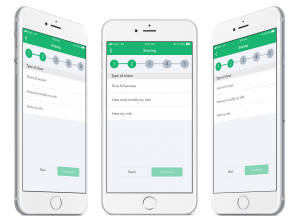
Tip 2 – Share your record with a trusted family member
This is important in case you ever are in a situation where you can’t check your record yourself, but your family still needs to check what medication you have been taking or your allergies. All you need to do is open up the settings tab and go to the ‘sharing‘ screen. You can choose just to share certain parts of your record.
Tip 3 – Set up Biometric ID and Two-Factor Authentication
If you are using the Lifecard phone app, you will be able to enable biometric (fingerprint and face ID) login, to avoid you having to input your full password each time. Open the settings tab in the menu, then ‘account security‘ and enable app lock.
If you are using the Lifecard Pro version, you can also enable Two-Factor Authentication for added security.
Tip 4 – Design your measurements dashboard
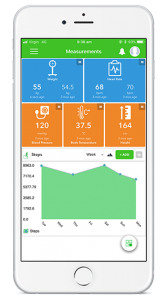
Lifecard lets you record over 80,000 data points. Depending on why you are using the app, there will be different measurements you want to record.
To find a new measurement, select the circle in the bottom right of the ‘measurements‘ screen. Search for the measurement you are looking for and click the toggle to turn it on. To save that measurement to your dashboard, click the heart on the left.
Once the measurement is saved on the screen, you can choose if the data is shown as a tile or graph by selecting the menu button on the measurement tile. You can also rearrange the order of how they are shown by holding down the tile and dragging it to where you want it.
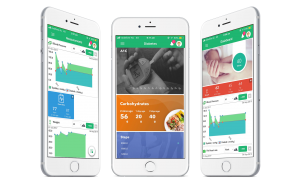
Tip 5 – Keep an eye on progress
To track measurements, select the measurement you can to add and click the ‘add‘ button. Enter the data and click save.
This will then track the progress of this measurement in a graph.
Tip 6 – Set reminders
You can use the Lifecard app to set health-related reminders. Some examples include daily stretches, weekly medication, upcoming immunisation reminders and reminders to do certain activities. When setting the reminder, you can choose the reminder time, frequency (once off, hourly, daily, weekly, monthly or yearly), how you receive the reminder (push notification or email) and the priority. You can also add a note.
Make sure you also have push reminders turned on in your phone settings.
Tip 7 – Tell your care providers
If you are using Lifecard in the management of a longer term, chronic health condition, be sure to let your health provider know you are using it so that they can send you copies of letters and results via Australian Health Standard Secure Messaging and request access to parts of your record to ensure you are receiving the highest quality care as possible.
Tip 8 – Customise your homepage
Your home screen contains the most relevant information. It will automatically show you your latest health records that have been updated, any pending tasks, reminders currently set and your favourites.
You can select your favourite information so you can easily access it from the first screen you see when
you open the app. Scroll down to find my favourites and click add.
Tip 9 – Explore the marketplace
If you are finding that the free version of Lifecard is not giving you enough, you can choose to upgrade to Lifecard Pro for a small monthly fee. You can also explore our condition-specific marketplace options that have been built specifically to support people with certain health conditions.
Tip 10 – Choose your language
Did you know that the Lifecard app can be viewed in four different languages? You can choose from English, Bahasa Malaysia, Thai or Vietnamese in the settings menu.
Tip 11 – You can export your data
We believe that Lifecard is your record, as such you have the ability to export the data collected in Lifecard. To do so, login to Lifecard from a web browser, open the measurements page and click ‘export‘. This will export any attachments you have saved, as well as a PDF of your profile information, medication list, allergies, medical history, measurements and immunisations.
What are you waiting for? Download the Lifecard App!
Download the Lifecard PHR App and create a Lifecard account.

